In the previous post, I discussed my perspective on providing some insight into a sequence of assessment and process of treatment for patients. I touched on my thoughts about certain principles that would safeguard both the manual therapist and their patient; then we discussed some basic thoughts on the lower extremity ending at the pelvis.
In this section I hope to serve you by discussing my thoughts and perspective in providing assessment and treatment for the lumbar spine.
Please remember that ALL structures in our bodies are connected, from the largest organ to the smallest arteriol. Everything is dependent on each other. When a part is removed or becomes dysfunctional, the rest of the system is affected in some form or fashion. Fascia, skin, vasculature, nerves, lymphatics, interstitial fluid…they all span the complete existence of who we are; we are never apart from them. Even though I have divided these discussions into sections, we as a whole are not.
The Lumbar spine
I find that when I mentor a NEW Manual Therapist in the assessment/treatment of lumbar spinal mechanics, they all seem to have had a fairly tough time learning the basic biomechanics at school. Why? For our purposes it’s actually quite simple.
I highly recommend in-depth personal study of spinal mechanics as the knowledge is necessary to have in conversations with DC’s, DO’s, MD’s and so on. Take your time, learn one law at a time and then put it into practice one law at a time. It will become clearer when you don’t try to remember everything all at once. Trying to remember all the laws and rules and put it into practice is why many become frustrated and then remove that part of assessment & treatment from their practice. This is a disservice to your patients.
Try to not get hung up on the intricacies of spinal mechanics. If you have a passion for research in this area, then I support you in your endeavour to find the truth. As far as I and the thousands of patients I’ve treated over the last 18yrs are concerned, understanding the basics are what will allow you to understand the movements of the vertebral column, what’s dysfunctional and what you need to do in order to start the process of making it functional once again; making a positive difference in their lives.
The following is a small sample of how I assess lumbar segments. Although I have read numerous texts, research papers, watched various videos on spinal adjustments, interviewed various manual practitioners (DC’s, DO’s, Physio’s etc…) about the how’s and why’s of manipulation, I’ve come up with a few basics it all comes down to.
First please remember that if you have any doubts about your knowledge of anatomy in this area, don’t treat it! If you don’t know where you are, get out! This is the rule I hold myself to!
Please go to the principles section in Part 1 and review it. It is very important when providing treatment here. Make yourself aware of the various injuries and condition that lumbar spines can present with. Spondi’s present and act differently that compression fractures, than OA, than DDD, than DJD and so on. Just because you know the basics of how a vertebral column should work doesn’t always mean that you need to make it work that way to be functional for that patient. Sometimes being somewhat dysfunctional is functional enough to allow the patient some level of functionality in their day to day lives. We would hate to take away what functionality they already have.
Remember:
“Small changes can result in disproportionately large changes!”
This is key here! We have the ability to affect lives positively or negatively.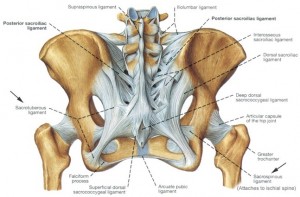
Personally, I treat the pelvis first. I find that the pelvis and the lumbar spine act as friends. If one is injured, the other will try to help out. The pelvis will become dysfunctional in attempting to stabilize a lumbar spine and vice versa. Attempt to balance the pelvis in your first few treatments. Go a head and provide some therapeutic treatment to the lumbar area, but making corrections at this point may be too risky in complicated patients.
If this is a patient you have been seeing on a regular basis, you are intimately familiar with their responses post treatment, and have done a precision assessment, go a head and provide some correction.
The following does not concern complicated patients suffering from degenerative conditions, processes, post surgeries, hardware or severe injuries such as compression fractures etc…
This is basic information!
For more involved information on treating cases that are advanced, search out Orthopaedic CEC courses that discuss this subject matter, buy and read texts that others recommend, talk to your local DC’s, DO’s, MD’s etc… Be as competent as you can before performing any technique that may place your patient at risk for harm.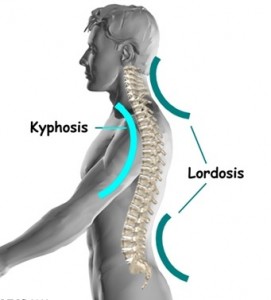
In most cases I first attempt to create a lumbar lordosis. Lumbar vertebrae are developed to be in a lordotic curve. When we are in pain we tend to want to get away from the pain, and in this region that means attempting to flatten the spine, positioning the vertebrae in hypolordisis. Treating in this position, acts as a positional release technique. We are attempting to make a change to the pain tension cycle. I have found that decreasing the tensile forces here accomplishes this.
This position comes with a caveat. You must have the patient activate the lumbar musculature before getting off the table! Here’s why. I’ve had experiences with patients where I’d done everything I’d been told to do that was appropriate for a treatment, everything I’d been told was the “right thing to do”… and have had the patient get off the table in what seemed to be a far worse condition than when they walked in. It’s terrible not knowing what has happened, why the treatment seemed to make the patient worse.
I had serious thoughts about quitting my practice when this occurred to me. I felt absolutely terrible and had no one to ask What the hell happened! I researched and read numerous texts concerning the mechanics and physiology that occurs in the vertebral column.
Here’s what I can figure happens. If someone out there can shed some more light into this mechanism, I welcome the additional education.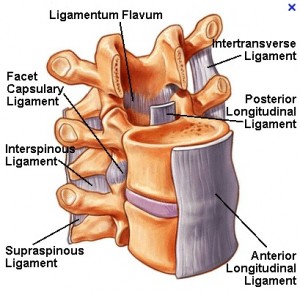
Concerning discs; remember the analogy that they are like jelly doughnuts. Well they are like jelly doughnuts, but with sponge like capabilities for absorption aka poroelasticity! Poroelastic discs are affected by low grade inflammation in the area. From what I understand, the disc moves from a compressed position to an uncompressed condition, absorbing inflammation which leads it to becoming irritated. Moving into weight bearing, this now irritated disc, has to bear the weight of the upper body which immediately increases the pain tension cycle, causing sever amounts of sharp shooting pain, discomfort and muscle spasms. Just the opposite of what we were attempting to accomplish!
This is where Active Movements by the Patient (AMP’s) come into play. Before the patient is allowed to get up from the table, I instruct them on the following;
First:
they must wiggle from side to side. Not quickly, but slowly in a controlled manner.
I’ve found that this is the least invasive of the movements & permits enough movement to “wake up” the proprioceptors and activate the musculature.
Second:
they must “hip hike” each side from side to side. This work’s the tissues in a completely different fashion and starts to get the discs more involved by “milking” them in a side to side manner.
Third:
they must move their pelvis in an anterior to posterior motion similar to a pelvic thrust on the table. Once again, our focus here is on the discs and preparing them for weight bearing.
I’ve found these actions promote synovial lubrication to the facet joints, increase circulation to the surrounding musculature, stimulate the proprioceptors and start the process of moving the inflammation back out of the discs, desensitizing them. Have the patient gently role onto the side they feel most comfortable going to, sit them up, stand them up and go for a test drive!
I usually have the patient perform these actions with 15-20mins left in the time. If anything unexpected occurs; I have some time to deal with it before the patient leaves.
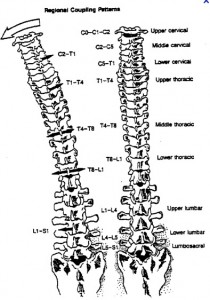
Basic forced coupling in a lumbar spine
There are numerous papers and articles that discuss the discrepancies in numerous papers and articles about the movements of the lumbar segments. We have info. from what we were taught in school and what various research papers tell us. Who to believe? Honestly, I’ve decided to go with the status quo. I’ll keep reading the research papers, until the status quo changes.
The following information I provide is based on my own clinical experiences over the years and nothing more.
Vertebral segments in the lumbar spine move in the following manor.
1.Opposite side rotation coupled to side bending in spinal neutral and extension
If a vertebra side flex’s left it should rotate right and vice versa. Palpate bilateral TVP’s of L5 just within the sacral sulcus’s, have the patient side bend to the right, L5 should rotate left, then have them side bend left, L5 should rotate right.
2. Same side rotation coupled to side bending in flexion
If a vertebra side flex’s left it should rotate left and vice versa. If you palpate both TVP’s of L5 just in the sacral sulcus, have the patient move into slight flexion, have them side bend to the right, L5 should rotate right, then have them side bend left, L5 should rotate left.
Always assess in all planes to get a precise picture of what is happening in the area.
If a vertebra does not move in this motion, there is a dysfunction.
Now that we are aware of the normal movements, we can use this to our advantage! Since we know how the vertebrae is/are NOT moving, and we know how it/they should be moving, we can use very precise, specific techniques to release the restricted soft tissues that are possibly contributing to the dysfunction and encourage the vertebrae to move in the correct pattern.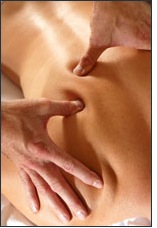
Treatment techniques can be utilized while the patient is seated, standing, prone etc… and can be added to a treatment at any point.
Focusing on the vertebral coupling motions adds a new dimension to your practice. With continued assessment and practice, this will allow you to address long standing issues that your patients have had. Being able to attend to both ligamentous articular issues and soft tissue issues enhances your practice & keeps you from getting into a common rut of doing the same thing over and over again.
Remember to slow down, be precise & specific in your assessments and treatment; choose to incorporate one technique at a time, get your patient’s active with AMP’s before they get up from the treatment table to prevent disc discomfort after treatment.
I commonly allow 72hrs of change to occur between treatments. It give the tissue time to adjust to the changes I’ve made. I view this time period still as treatment time. The body will continue to work and make changes in it’s physiology during this time period.
A small piece of advice before we end; purchase a thumper! These are underutilized in our industry. I was taught how to incorporate it into treatments 20yrs ago while I was a student. I didn’t take the opportunity to incorporate it into my practice until the last few years. It’s had changed how I treat. My hands are thankful!
Conclusion
As always, I hope that I have been able to serve you in some way with this information, be it a completely new perspective into your patients, be it some new thoughts about how to approach a treatment or provide you with a review and acknowledgement that what you are doing, as far as I’m concerned, is having an amazingly positive impact in improving the quality of life for your patients.
